CTSS: Getting data in and out

There are two approaches to getting data in and out of CTSS - one involves using the contemporary tools of the operating system, the other is to use facilities provided by the s709 emulator. We'll look at both, but first we need to understand what I/O meant when CTSS was originally running.

/images/ctss/ibm-029-card-punch-montage.jpg Using the IBM 029 Card Punch. Source: deepblue. Copyright: Board of Regents, University of Michigan.

Data interchange in the 1960s

At the time there were basically three media that could be used.

Printed paper - as typewriters were used as consoles, a printed record of what you were doing would be created automatically. But the print quality was not great, and it would also be slow to print a large file. So computer facilities like MIT offered ways to print on a faster and better quality printer.

Punched cards can be used for both input and output of programs and data. A user could punch a set of cards offline on a dedicated key punch (see image above), and get them loaded into the system. They could also get the computer to punch out cards and use the resulting deck as a backup or a way to transfer the data to another computer. At roughly a line of 80 characters per card, this only made sense with relatively small amounts of data; they were also slow to read.

Magnetic tapes was the choice for large amounts of data needed to be backed up or transferred elsewhere, but these were more expensive. Although operators and system programmers would use tape regularly, I believe end users would be less likely to use tape, at least at the time of CTSS.

(One further option was paper tape, but I believe this was used on smaller computers like the PDP-1.)

Mapping this to emulated systems

Card punches and magnetic tape drives are things you are very unlikely to have access to today - even printers are getting more scarce - so how does this work with an emulated system?

Put simply, it maps to files on your host system. Printer output goes to a single text file. Cards and tape map to binary files whose format is determined by the emulator, which provides tools to convert them to PC readable data at the cost of losing the original format.

Let's look at some ways we can use to do data interchange, starting with facilities provided by CTSS.

Printing and punching files via RQUEST

On the real 7094, printing and card punching was not done online due to the CPU load it would place on the system. Instead, users could request files to be printed and punched. Several times a day, the CTSS operators would collect the files on to a tape and bring this to a smaller system for printing and punching, and then distribute the results to users. The command to initiate this on CTSS was RQUEST.

We can use this facility with the emulator as well.

  1. While online, type RQUEST PRINT name1 name2 to request printing of file name1 name2 or RQUEST DPUNCH name1 name2 to request punching. Wildcards are OK, so you could type RQUEST PRINT * BCD to produce a print out of all compile listings.
  2. Shut down CTSS
  3. Run dskedtctss on your host
  4. You will need to press Enter a few times and then `q` when done.

If you are running the ELIZA version of ctss-kit, all printer output will be in output/sysprint.txt and each punched file will be a separate file based on the original filename in output.

For the upstream version of ctss-kit, you will need to convert the output tapes produced by dskedtctss as follows:

  • Printouts: Run bcd2txt -p sysprint.bcd sysprint.txt.
  • Punches: Run punchctss syspunchid.bcd syspunch.bcd .

Downloading files via the emulator

We can use a utility provided by s709 called extractctss to get files from inside CTSS to your host machine. Usage is:

extractctss file-type name1 name2 prob prog local-file

file-type should be t for card image files and l for listings.

Note that the CTSS system should be shut down when you do this.

A sample run to get the HELLO MAD source file from the guest user:

extractctss t hello mad m1416 guest hello.mad

This will produce hello.mad in your current directory.

extractctss can also download several files in batch mode; see the ctss-kit README for more details

Should you use RQUEST or extractctss? I use both and think RQUEST is useful when you are logged into CTSS, looking at files and picking several to print or punch. extractctss is great for automated downloading.

Uploading files via the emulator

You can also go the other way, uploading files from your host machine to CTSS. This is a two step process.

First, convert the file into a tape format readable by the upload program using obj2img. Here's an example to prepare upload.mad to become file UPLOAD MAD on the guest account:

obj2img -a " M1416GUEST " -f upload -e mad -t -o upload.img upload.mad

The -a flag determines the account to send it to; the problem number (M1416) must be right justified into 6 characters, and the programmer number (GUEST) must be left justified. Both must be in capital letters.

The -f and -e flags determine the name1 and name2 of the file on CTSS.

-t specifies card image format; obj2img can also do line marked, binary files and other special formats. See obj2img -h for options.

Second, to get this image file loaded into CTSS, run setupctss as follows:

setupctss upload.img 

IBM 7094-CTSS Simulator 2.4.3


 ATTACHING TO  M1416 GUEST                                              
 COPY TO TEXT FILE UPLOAD    MAD                                        
 DISK INITIALIZATION COMPLETE.                                          
 CTSS IS FINISHED. YOU MAY NOW CLEAR CORE.

You can then remove the .img file.

Areas to explore

The Disk Editor on the real CTSS system also allowed you to upload files by giving the operators a card deck, but I don't believe this is supported on the s709 virtual system.

CTSS provided a number of tape handling commands so you could MOUNT a tape and then associate files on there with entries in a UFD to it can read/written. These commands are available, but are not fully supported by s709 I believe.

Questions, corrections, comments

I welcome any questions or comments, and also especially any corrections if I have got something wrong. Please email me at rupert@timereshared.com


CTSS: Commands

In this post we'll run through what commands are available on CTSS. This is based on the The CTSS Programmer's Guide section AH, but is reordered here for simplicity. A page reference to the PDF is given for each command.

This does not cover programming languages, loading and debugging facilities; these will be covered in a later post.

In some cases a command is described in the guide but is not available on the emulated systems, which is shown using strike through. This is because the CTSS we have today was reconstructed from a listing tape which does not include every command that was present then.

/images/ctss/ctss-programmers-guide.png The CTSS Programmer's Guide with its "candy stripe" cover.

Logging in/out

Command Meaning Guide
LOGIN Login to the system p282
LOGOUT Log out p286
TTPEEK Show quotas p290
DIAL Attach a remote terminal p291
HELLO Print system message p292
SUBSYS Restrict interactive environment p532
OPTION Set subsystem options p538
WHO Prints who is online p544

LOGIN is the only command available when you first connect to CTSS. It is also treated as a user level command so you can use it to switch accounts when logged in.

TTPEEK will show how much CPU time and disk space you have used. A quota for this was established when a user ID was created.

DIAL allows a non logged in terminal to be associated with a logged in session. Once associated it can be used by programs on the logged in session to send and receive text, but cannot run commands directly. However none of the existing commands on CTSS use this facility.

HELLO gives a simple system summary similar to what you see at login.

SUBSYS and OPTION restrict what type of operations can be done. It seems to be intended as a way for a login to be used to run a specific interactive program rather than issue general commands. These are selected by the user and can be changed so it is not a security mechanism.

A sample of WHO output:

who
W 1815.0
        
MIT8C0 STARTED AT 1127.2 02/15.
                               
 2  USERS AT  1815.0 02/15.
                           
LINE   USER     NAME  GRP UNIT  TUSED TIMEON
 1 C0056 99995 FIBMON  0 (FIB)     .0 1127.2 02/15
 3 M1416    10  ELIZA  1 700000    .0 1815.0      
                                            
R .016+.016

File management

Command Meaning Guide
CHMODE Change the permissions on a file p406
DELETE Delete a file p406
LINK Make a link to a file p345
MOVE Copy a file within the same UFD p370
PERMIT Grant access to another user p345
RENAME Rename a file p406
REVOKE Remove link access to a file p345
UNLINK Remove a link to a file p345
CALL System call wrapper p415

These have been discussed in the post Files and directories.

The exception is CALL, which is a thin wrapper around several system calls. For example to delete a file A MAD you could use CALL DELFIL A MAD.

Show file contents

Command Meaning Guide
P Quickly print a file in an appropriate format p400
PRINT Type a text file to the console p393
PRBIN Dump a file in octal p395
PRBSS Print details of a BSS file to the console p397
SDUMP Print a summary of a SAVED file to teh console p398
PRINTA Print an ASCII file to the console p399
PRINTF Print a card image file to the console p392

P is a good choice to view any type of text file.

Editing

Command Meaning Guide
ED Older card image file editor p333
EDC Card image file editor p372
EDL Line marked file editor p351
EDB Binary file editor p352
EDA ASCII file editor p369
QED Programmable editor p353

These are all line-orientated editors. The ED family shares a very similar command set, documented on the ED page. QED is a more sophisticated editor allowing multiple buffers; it was created by Ken Thompson of Unix fame. I go into more details in the articles on EDC/EDL and QED.

File transformation

Command Meaning Guide
SQUASH Convert card image to line-marked p379
XPAND Convert line-marked to card image p379
CRUNCH Compress/uncompress BCD files p377
SQZBSS Compress BSS files p381
PADBSS Uncompress BSS files p381
ARCHIV Archive several files into one p374
APENDA Append to an archive p383
AARCHV Version of ARCGIV for ASCII files p382
APND Append a file p370
APEND Append several files p420
COMBIN Combine several files p402
SPLIT Spliu a file into several p404

These exist to translate between text formats and to save space.

We looked at SQUASH and XPAND in the post Files and directories.

CRUNCH was used with the BEFAP assembler which is also not available.

SQZBSS and PADBSS works on BSS object files by removing card sequence numbers and compressing sequences of zero value words.

ARCHIV is reminiscent of Unix tar, bundling a number of files into a single file so it takes up less space (both in terms of disk and entries in the directory) and can be un-archived later. Its first argument is a command like C for create and X for extract, also implying that tar was modelled on this. The semantics were a bit different as it generally worked on files with the same name2. For example, if you wanted to archive files A MAD B MAD and C MAD into an archive ARC MAD you would type archiv arc mad a b c.

APND is used as follows:

APND sub mad main mad

which will append a copy of SUB MAD to the end of MAIN mAD.

APEND is similar but takes multiple files as input and writes to the first file as output, so to get SUB1 MAD and SUB2 MAD appended to MAIN MAD you would do:

APEND main mad sub1 mad sub2 mad

COMBIN is useful for card image files as it can adjust the seqeunce numbers of the combined file to make them contiguous. It is also used to create a libary from several BSS files.

Directory management

Command Meaning Guide
LISTF Print files in a directory p384
ATTACH Change to another user's directory p419
COMFIL Change to a common file directory p408
COPY Copy a file from a common file directory p409
UPDATE Copy a file to a common file directory p409

We looked at these in the post Files and directories.

Command execution

Command Meaning Guide
RUNCOM Run a sequence of commands p526
SAVFIL Save a runcom file execution status p343
RERUN Restart from a SAVFIL file p343
FIB Submit a backgroud job p287
DELFIB Delete a background job p287
PRFIB Print pending background jobs p287
GENCOM Supply non printable args to a command p531
ECHO Prints command before running it p546
YES Like ECHO but prompts first p550
WAIT Like ECHO but sleeps first p551
TIME Like ECHO but prints time first p552
. Command interface p328
WRITE Send chat messages p328

RUNCOM will run a series of commands stored in a file.

The FIB commands allow you to queue a job to be run the next time you are logged out.

Both of these will be discussed in a later post.

ECHO is like the Unix shell set -x in that it prints its arguments and then executes them as a command.

Input/Output

Command Meaning Guide
RQUEST Request printing or punching p412
RQASCI Request offline ASCII printing p421
MOUNT Request a tape to be mounted p348
UMOUNT Request a tape to be unmounted p348
VERIFY Read the label on a tape p348
LABEL Set the label on a tape p348
TAPFIL Add a file to a tape p348

We'll look at these in the next post.

Text processing and email

Command Meaning Guide
TYPSET Create a formatted text file p504
RUNOFF Print a TYPSET file p504
ROFF Print an ASCII memo file p523
PINFO Print information files p525
MAIL Send a message to another user p521

PINFO appears to be like the Unix man command, showing text files about each command on the system. Both PINFO and its files are not available on the CTSS we have.

Miscellaneous

None of these commands are available on the CTSS we have today. Most deal with typewriter control.

Command Meaning Guide
PRINTER Print error diagnostics p542
PERROR Explains error codes p553
SPACE Insert blank lines p545
EJECT Eject a page p545
PON Turn typewriter printer on p548
POFF Turn typewriter printer off p548
RED Change printer ribbon colour p549
BLACK Change printer ribbon colour p549
OCT Octal to decimal conversion p547
DEC Decimal to octal conversion p547
REMARK Send remarks to operators p520

PRNTER appears to be used to debug issues communicating with a typewriter.

REMARK allows a user to send comments to the operators: these are appended to a public file and was then printed out once a day.

Questions, corrections, comments

May 2025: Tom Van Vleck pointed out a typo in the example of using APND.

I welcome any questions or comments, and also especially any corrections if I have got something wrong. Please email me at rupert@timereshared.com and I will add it here and update the main text.

CTSS: Files and directories

CTSS was not the first system to have a hard disk - that may have been the IBM RAMAC in 1956 - but as a time-sharing system it pioneered using the disk for online, multi-user, persistent random-access storage for user files and programs, as opposed to using the disk as a fast tape drive or a slow secondary memory.

Looking at its features, we can see how it evolved to match what users wanted. For example, the original filing system only allowed one person to read a particular file (or a directory) at a time, so there was no easy way for a group of people to work together on a file without taking copies of it. Features like common file directories and links were added to support this.

/images/ctss/ibm-1301.jpg

The IBM 1301 disk drive. Source: IBM manual

File names and types

As mentioned previously, each file name has two parts, with up to six characters for each part. (Six characters as a limit comes up a lot in CTSS, as 6 x 6 bit BCD characters would fit into a 36-bit machine word.) The two parts of the file name (called name1 and name2) are separated by a space when giving them to a command.

By convention, the second part of the name indicated the file type, eg MAD for MAD source code or BSS for object files.

Metadata on the file directory included the record size and the number of records, so fixed record data files are supported.

Text files

Text files evolved over time. Initially card image or line-numbered files were used: these use 14 machine words (so 84 BCD characters) per line. This allows interchange with punched cards, with each card representing a line in the file. Especially at the start of CTSS, many users would have collections of cards for their programs and data, and would transfer from these to and from the disk. The line-numbered name refers to the convention for punched cards of having a sequence number in columns 73-80 so the order of cards could be recovered if you accidentally dropped the deck on the floor.

Although easy to access specific lines, the problem with this format is it is inefficient: a completely blank line would be represented by 14 words of space characters. Line-marked files offered a solution, where each line could have a variable length and the start of each line would have a marker and its length.

Later on - I think as a byproduct of doing Multics development on CTSS - ASCII format files were supported, with the familiar 8 bit encoding and variable line length. There was also support for 12-bit BCD files which packed 3 characters into a word and allowed lower case.

It is up to each program to decide what type of files it supports. The MAD and FAP compilers accepted both card image and line-marked files, but some other compilers only accepted one format. For editing files, use EDC for card image and EDL for line-marked.

You can convert a card image file to a line-marked one with the SQUASH command and go the other way with XPAND.

As an example, let's look at a two-line program stored as a card image file HWC MAD and as a line-marked file HWL MAD. We use PRINT to show how the two files look and PRBIN to show a binary dump.

Note that PRINT puts the line number at the start of the print out. PRBIN will print in octal, with each two-digit number representing a BCD character; for example, 60 is space and 00 is digit 0.

print hwc mad
W 1059.9
        
   HWC    MAD      01/11  1059.9
                                
   00010               PRINT COMMENT $HELLO, WORLD$
   00020               END OF PROGRAM              
R .016+.016                          
           
prbin hwc mad
W 1100.0
        
   HWC    MAD  01/11  1100.0
                            
     1 606060606060 606060606047 513145636023 464444254563 605330254343 467360664651
     7 432453606060 606060606060 606060606060 606060606060 606060606060 606060606060
    13 606060000000 010060606060 606060606060 606060606025 452460462660 475146275121
    19 446060606060 606060606060 606060606060 606060606060 606060606060 606060606060
    25 606060606060 606060606060 606060000000 020060606060                          

R .016+.016

print hwl mad
W 1101.7
        
   HWL    MAD      01/11  1101.7
                                
	PRINT COMMENT $HELLO, WORLD$
	END OF PROGRAM              
R .016+.016           
           
prbin hwl mad
W 1101.8
        
   HWL    MAD  01/11  1101.8
                            
     1 777777000005 724751314563 602346444425 456360533025 434346736066 465143245357
     7 777777000003 722545246046 266047514627 512144575757                          

R .000+.016

Directories and common files

Directories in CTSS are rooted in the single Master File Directory (MFD) which contains pointers to several User File Directories (UFD). Each user would have their own UFD named after their login project number and name, eg M1416 GUEST. It is not possible to make sub-directories under a UFD.

You can change to another user's directory with eg ATTACH M1416 ELIZA and return to your own directory with just ATTACH. But you are only able to do this if the other user has given you access with PERMIT.

Common files are UFDs intended for sharing. There are 5, numbered 1-5 and named CMFL01 to CMFL05. Although you could use ATTACH, the simplest way to get to them is type COMFIL n where n is a number; 0 will return you to your own directory. On s709/ctss-kit, this is how they are used

COMFIL Contents
1 Supervisor object code
2 System binaries and accounting files
3 Unused
4 System libraries
5 Unused

You can also view other directories using LISTF without changing to them by giving parameters. Foe example, the MAD compiler is stored as MAD TSSDC. in common files 2. Here is two ways to see it.

listf (cfl2) MAD TSSDC.
W 1122.7
        
   MAD TSSDC. 000    33 01/10/14
                                

R .016+.033
           
comfil 2
W 1122.8
R .000+.000
           
listf MAD TSSDC.
W 1122.8
        
   MAD TSSDC. 000    33 01/10/14
                                

R .016+.000

COPY will allow you to take a copy of a file from common files to your own UFD. Let's return home and grab that binary.

comfil 0
W 1123.9
R .016+.000
           
listf mad tssdc.
W 1124.1
        
NAMES NOT FOUND
   MAD TSSDC.  
             
R .016+.016
           
copy 2 mad tssdc.
W 1124.3
R .050+.016
           
listf mad tssdc.
W 1124.4
        
   MAD TSSDC. 000    33 01/11/14
                                

R .033+.016

UPDATE does the same in reverse, ie copies a file from your UFD to a common file directory.

However there is no way in general to refer to a file in another directory, so for example if you want to PRINT a file you would need to change directory first rather than referring to a path to access it.

File management

RENAME and DELETE work as expected. MOVE is used to copy a file within the same UFD.

Links

CTSS also had a way to link a file name to another one. This is what we'd call a soft link today - there is a record pointing to a file name rather than multiple directory entries. This was often used to make files available to other users, for example having a common file entry point to the real file in a user's UFD. Links have a maximum depth of 2.

Permission to link must be granted via PERMIT, even to link to your own files. So to make HELLO2 MAD point to HELLO MAD we could do:

permit hello mad 0 * *
W 1742.0
R .000+.016
           
link hello2 mad m1416 guest hello
W 1742.2
R .000+.016
           
listf
W 1742.3
        
    10 FILES    14 RECORDS
 NAME1  NAME2 MOD NOREC   USED
PERMIT   FILE 120     1 01/11/14
 HELLO    MAD 000     1
  [...] 
                       
HELLO2    MAD 000  M1416 GUEST   HELLO
                                      
R .016+.016

Note PERMIT saves permissions to PERMIT FILE rather than using file metadata, and that the new link file is displayed at the end of LISTF output in a special format.

UNLINK can be used to remove a link file.

Permissions

You can see the permissions field in the MOD column of the LISTF output above. Like Unix there are three octal digits that can be OR-ed together but the meaning is different

Mode Meaning
--1 Temporary - file will be removed after next read
--2 Secondary - file is being backed up and will be removed
--4 Read-only
-1- Write-only
-2- Private - file can only be referenced by its owner
1-- Protected - permissions can only be changed by its owner ted

The effect of making a file both read- and write- only seems to be neither is permitted.

Permissions to delete a file come from whether it can be written to or not.

The command to change permissions is CHMODE which takes the file names first and then the new mode at the end.

Further reading

The CTSS Programmer's Guide section AD discusses how the file system works, and sections AH.3 - 6 have further details on the commands mentioned in this post.

Questions, corrections, comments

I welcome any questions or comments, and also especially any corrections if I have got something wrong. Please email me at rupert@timereshared.com


The CTSS supervisor

The supervisor is at the heart of the CTSS system and operates similarly to what we'd call a kernel today. Let's look at each of its functions, comparing them to modern systems to get a feel of what is different.

Hardware

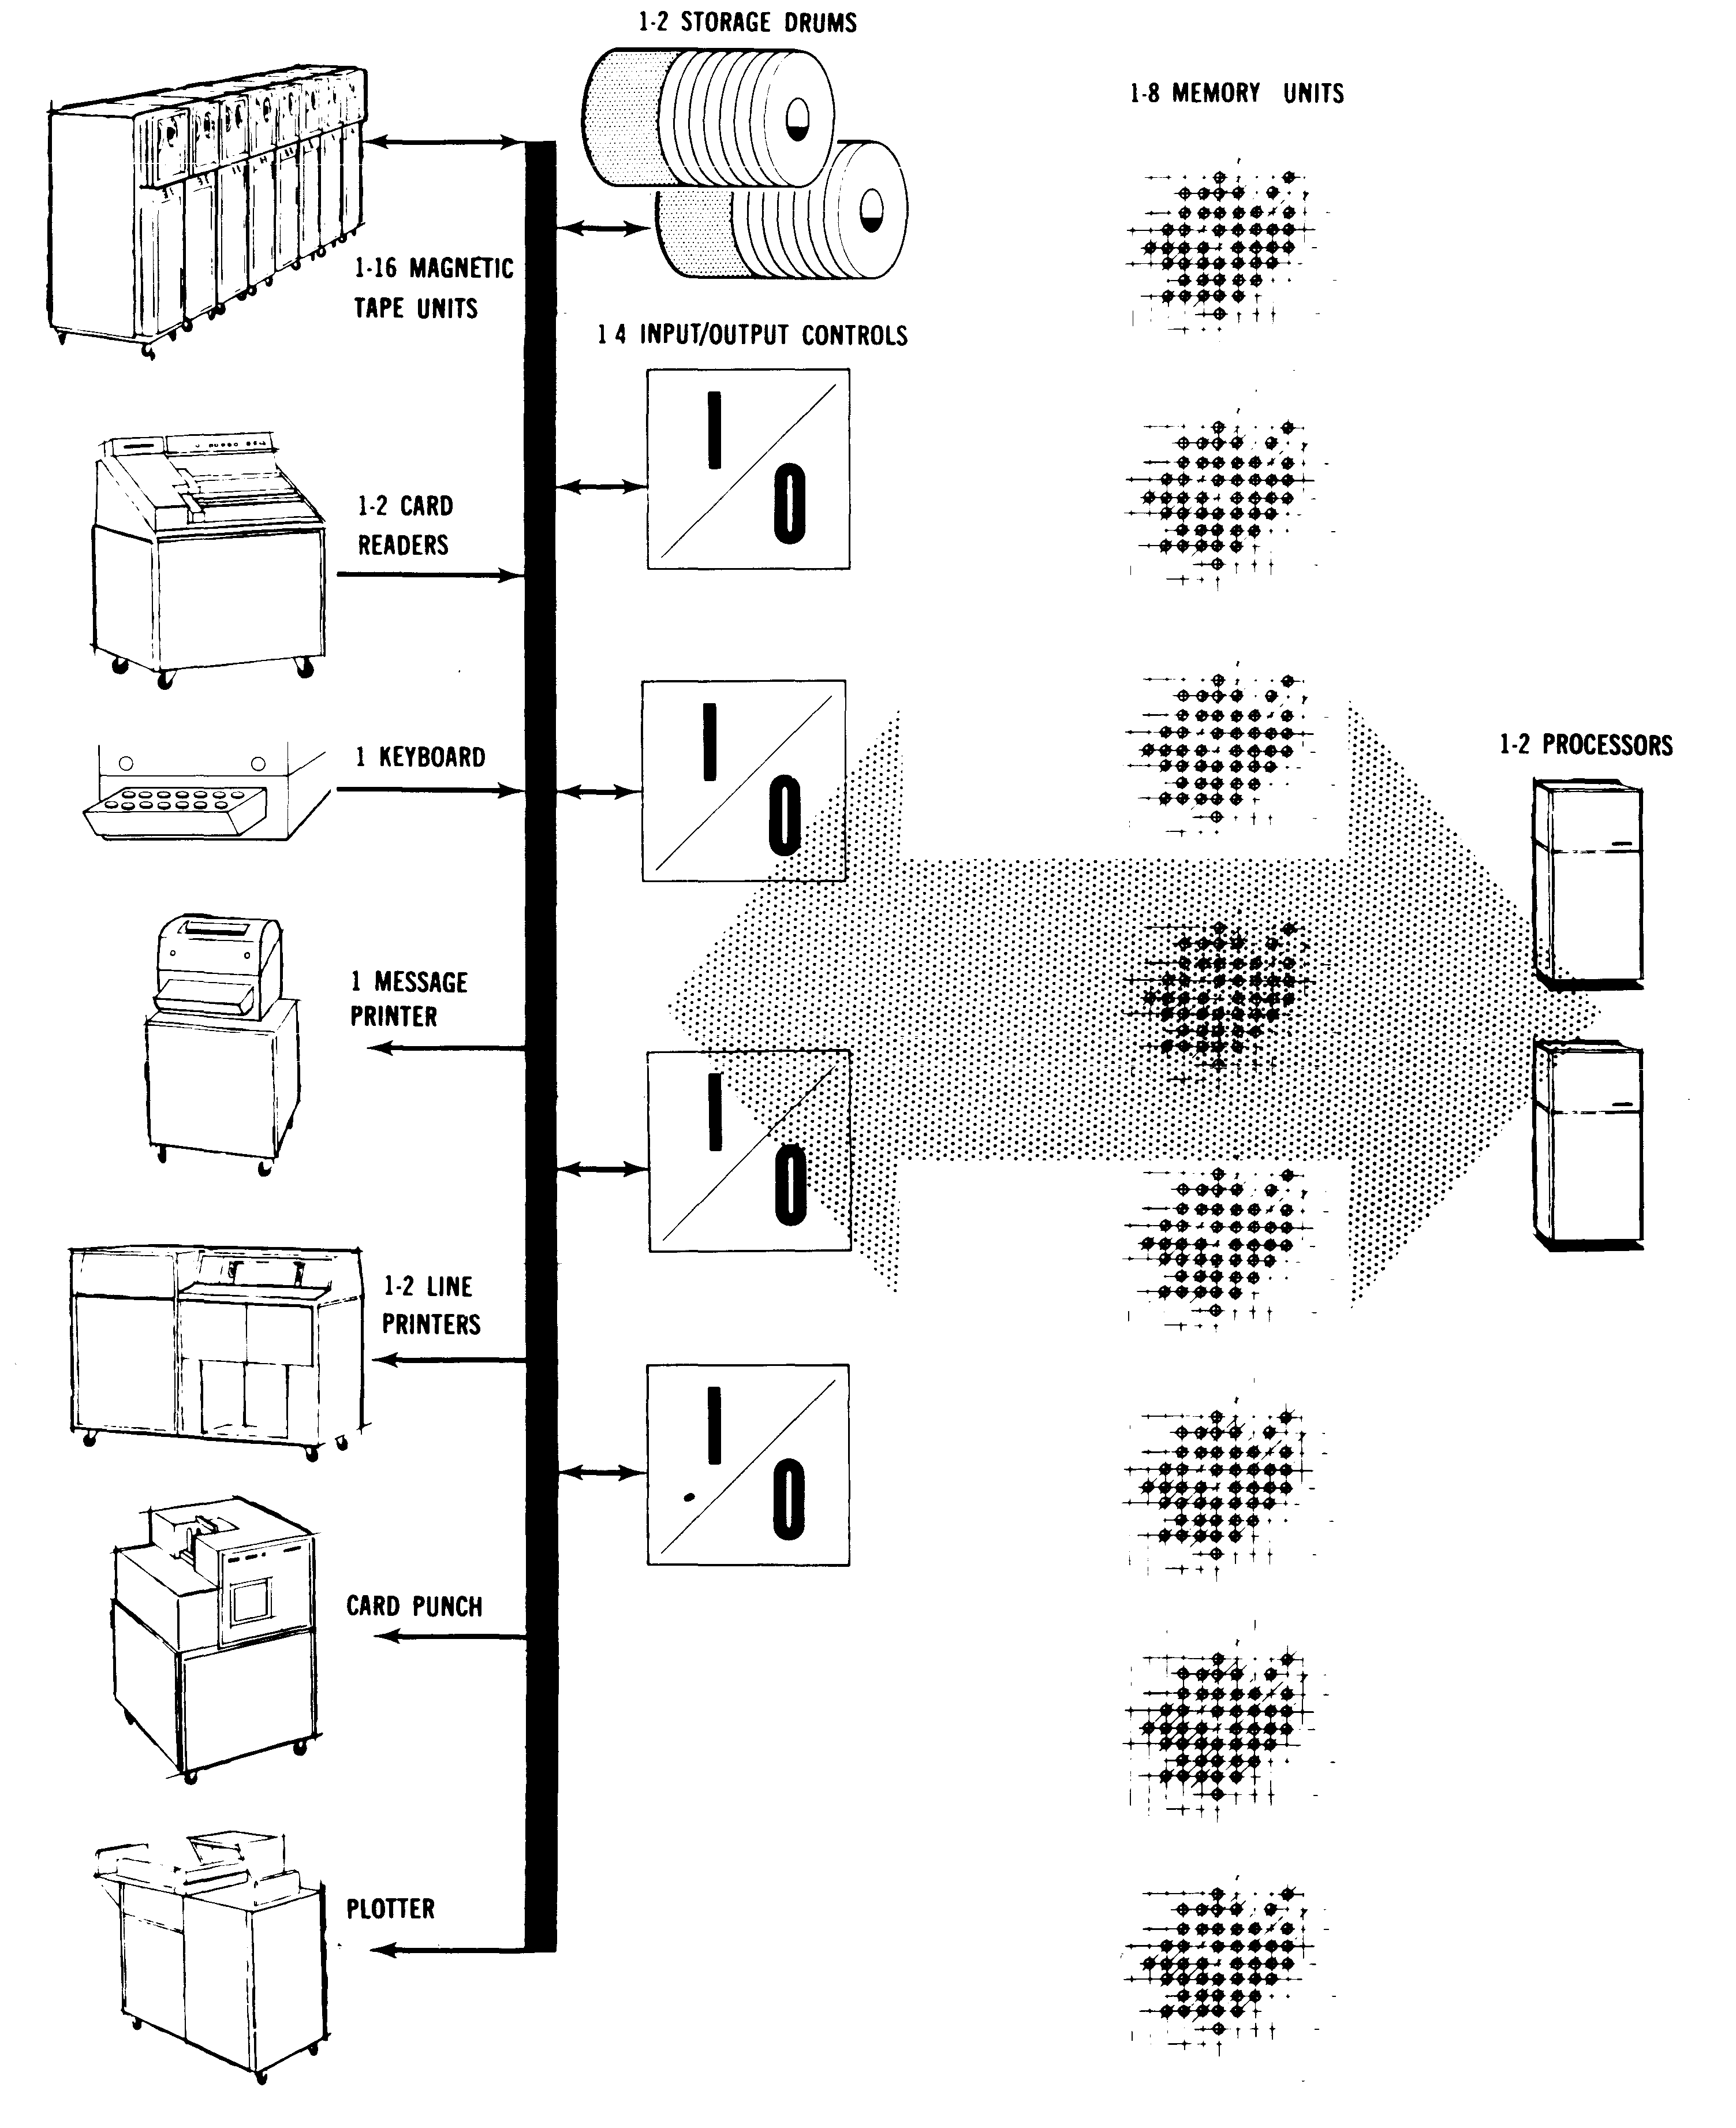
/images/ctss/ctss-hardware-diagram.png Diagram of CTSS hardware. Source: Rupert Lane. License: CC0.

The hardware controlled by CTSS changed over its lifespan. This is the setup that matches the CTSS source code used in the emulator. Most I/O work was done by channel controllers which offloads some of the work from the CPU. Each channel can have up to 10 devices connected to it. User programs cannot access components directly, they need to go through supervisor services.

Memory

There are two separate 32kW banks of memory, known as Core Memory A and B. Note each word is 36 bits, so that's the equivalent of around 147 kilobytes in each bank. As the 7094 can only address 32kW at a time, these are switched between as needed. The supervisor sits in Core A at all times. User programs are brought into Core B as requested by the user, and may be swapped out to drum or disk as CTSS schedules other tasks to run. The maximum memory available to a task is 32kW and there is no concept of virtual memory; however several smaller tasks can be in memory at the same time.

Tasks

A fixed maximum number of users can be logged in at any time (30 is the limit on the emulated system). Each user can only have one task active, so could not login twice simultaneously or create (fork) a new task while an existing one is running.

There is no equivalent to a shell as a separate user program. Logged in users type in commands which are processed by the supervisor. Commands and their parameters can each be up to 6 characters long. Commands can be either system programs (eg LISTF) or user created programs and are treated the same way: the supervisor will load the program into core B and transfer to it. Once a task is completed, control is returned to the supervisor.

Each task can be in a particular state, such as working, waiting for I/O etc. Two special states refer to the task after it is completed: dormant means the program has finished but is still in core so can be restarted or the machine state analysed. Dead means the program is out of core.

Scheduling

The scheduling algorithm for CTSS evolved over time as experience was gained using the system. As of the later system it had nine priority queues, ordered so that smaller or newer tasks would get a small amount of CPU time quickly, and longer running tasks would run less frequently but get more CPU time when it was being run.

It is also possible to run background tasks at a lower priority. This included jobs submitted by users from the online system (called FIB jobs) as well as non-time-sharing aware jobs, such as batch or standalone 7090 programs. This ability to run pre-CTSS jobs explains the 'Compatible' in the OS's name.

Protection

CTSS applies relocation to each task so it can be placed anywhere in memory without the task being aware of its physical position. The system also keeps track of what areas of memory the program is using, so any access outside of there leads to a protection violation and the program being terminated.

Further reading

The original paper by Fernando Corbato is available at the ACM. It describes an earlier version of the system we have today, but also includes information on why the system was developed.

The CTSS Programmer's Guide section AA gives more detail on the supervisor.

Bob Supnik's analysis of CTSS hardware was also useful in understanding how CTSS worked and is emulated.

Questions, corrections, comments

I welcome any questions or comments, and also especially any corrections if I have got something wrong. Please email me at rupert@timereshared.com


Early software on the IBM 7x

In the beginning, there was nothing. At the launch of the 701 in 1952, IBM would happily sell (or rent) you a computer, but it came with no operating system and no high-level compilers, as these did not exist yet. What you had was machine code and some early assemblers.

Indeed, IBM was not really in the business of selling software at all. IBM would facilitate meetings amongst its customers on ways to program its computers. Techniques to automatically assemble machine language programs were discussed, but each site would adapt these for its own use. Over time, through user groups such as SHARE, assemblers and subroutine libraries were distributed and improvements suggested. An example of some of these for the 704 can be seen at Richard Cornwell's page.

Using the computer without an operating system

How then was the computer used?

/images/ctss/701-programming-example.png

Sample hand written program for the 701. Source: IBM's early computers by Charles J Bashe.

According to George F. Ryckman, who worked with a 701 at General Motors Research Laboratories in the early 1950's:

Each user was allocated a minimum 15-minute slot, of which time he usually spent 10 minutes in setting up the equipment to do his computation. He mounted his own tapes and set up the card reader, card punch, and printer to carry out his computation. By the time he got his calculation going, he may have had only 5 minutes or less of actual computation completed-wasting two thirds of his time slot.

For the programmer, this was not a great experience as they had limited time to debug their programs. For the computer owners it was even worse, given the great expense of the machine, most of the time the CPU was sitting idle as programmers set up their program and tried to work out what was going on,

Early high level languages

The idea of a programming language operating at a higher level than assembly had been discussed since the 1940s, with one of the first fully working ones being Short Code for the UNIVAC. Assembly language programmers expressed scepticism: running a compiler would add to the time taken to produce the machine code, and how could code produced by a compiler compile to their own hand-optimised code?

/images/ctss/fortran-manual-cover-1956.png

Cover of the 704 Fortran manual. Source: IBM Manual at bitsavers.org

Fortran, developed between 1956 and 1957 by John Backus and a team at IBM, helped answer these questions. It had a syntax that allowed easy translation of mathematical formulae into code and was fairly quick to run. Scientists and researcher adopted it quickly, and it spread to many other contemporary computers.

A simple Fortran program to print Hello World 5 times:

C     HELLO WORLD PROGRAM
      DO 10 I=1,5
      WRITE (6,20)
10    CONTINUE
      STOP
20    FORMAT(13H HELLO, WORLD)
      END

Another early language was MAD, the Michigan Algorithm Decoder. Developed at the University of Michigan in 1959 for the 704, it provided a more English-like syntax inspired by early drafts of the Algol language, and had a fast compiler.

The equivalent of the above program in MAD:

*     HELLO WORLD PROGRAM
      THROUGH LOOP, FOR I=1, 1, I .G. 5
          PRINT COMMENT $HELLO, WORLD$
LOOP  CONTINUE
      END OF PROGRAM

Batch operating systems

High level languages like these helped speed the development process, but the problem of efficient machine utilisation was still present.

The solution to this was batch processing. A series of jobs for several programmers could be grouped together into a batch of work that could be executed by the computer in sequence with minimal set up time. Programmers would submit their code and running instructions to the operator, who would prepare a set of tapes to load into the computer and execute. After the batch was run, a tape containing items to print or punch to cards would be transferred to a smaller computer, and the physical paper/cards delivered to the programmers.

The development of these batch operating systems again started with customers contributing and sharing code: examples are the SHARE Operating System and Bell Labs' BESYS. Eventually, IBM adapted the Fortran Monitor System (used at MIT) and released this as IBSYS.

An example of a set of control cards to compile the above Fortran code, run it and produce a listing.

$JOB           HELLO WORLD
$EXECUTE       FORTRAN
$ID    HELLO
*      XEQ
*      LIST8

Along with increased utilisation, this helped efficiency as jobs had to be submitted in a way that was understandable by the computer. The set up tasks were also done by experienced operators who used the machine constantly rather than programmers who did not.

The disadvantages were latency and lack of debugability. It could take hours or days for the batch to finish and each programmer to receive their output. Minor errors in the program that could have been quickly fixed in the "open shop" method of operation would now have to wait for the next batch run.

The solution to this was time-sharing, of which CTSS was one early example. Next time we'll look at CTSS, starting with the supervisor.

Further reading and things to try

Questions, corrections, comments

Please email me at rupert@timereshared.com and I will update this page.


← Previous  Next →